JavaScript prototypes. It doesn't have to be complicated.


It's hard to skip prototypes (or the prototype chain or prototypal inheritance) if you want to dive deeper into JS development (Not only pure JS, but also Node.js, Frameworks like Vue.js, React.js, Angular,...).
If you are like me a few years ago and get some serious headache each time you have to deal with prototypes in JavaScript, this will probably be THE article you were looking for to get your head wrapped around the principle of prototypes in JS.
From the MDN documentation (don't be scared, we'll clarify everything below):
When it comes to inheritance, JavaScript only has one construct: objects. Each object has a private property (referred to as [[Prototype]]) which holds a link to another object called its prototype. That prototype object has a prototype of its own, and so on until an object is reached with null as its prototype. By definition, null has no prototype, and acts as the final link in this prototype chain.
Private [[Prototype]] property
Refer back to the below illustration whenever you feel the need, it might help you to wrap your head around this concept easier.
So let's start from the base. Every object in JavaScript has a private [[Prototype]] prototype, which holds a reference to another object (or null). This means, that our new object will have access to methods and properties of that referenced object.
The private prototype object can be accessed with Object.getPrototypeOf() (to get the private prototype property) and Object.setPrototypeOf() (to set the private prototype property). Additionally you can also use __proto__ in some browsers to get and set this prototype.
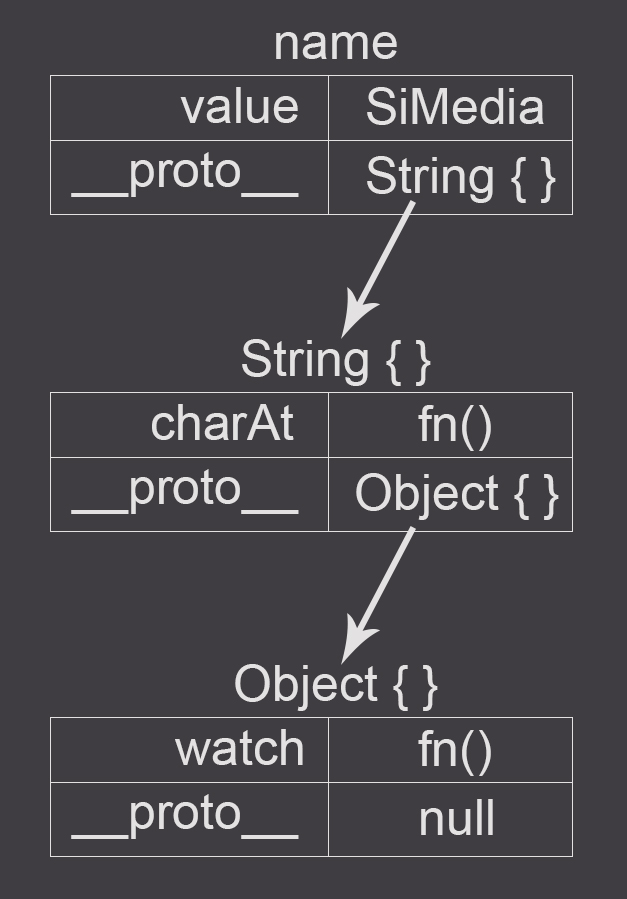
In my opinion, things are easier with examples. So let's take a string to demonstrate how the prototype chain works.
const name = 'SiMedia';
Let's verify the prototype chain of the above string with the following code:
console.log(name.__proto__); // String {}
console.log(name.__proto__.__proto__); // Object {}
console.log(name.__proto__.__proto__.__proto__); // null
As we can see, our variable name has it's private prototype property set to String, so we can use methods like name.charAt() without the need to define them on our name object directly.
In the above example, the String.prototype object also has a private prototype set to Object.prototype (this happens, because String.prototype already inherits by default from Object.prototype. This allows us to use methods like name.watch(), even if the method isn't defined on the name object nor on the String object.
How does the prototype chain actually work? Let's imagine you call name.charAt(). First, JavaScript will search in the name object for a property named charAt. If there is no such property, JS will walk up the prototype chain. In our case, it will reach the String.prototype object and look, if there is a property charAt. Woohoo, we got such a property charAt on String. So the method charAt from the String object will be called on our name object.
This prototype chain could go up indefinitely, until the chain reaches a private prototype property set to null (as it is the case for Object.prototype).
Now we know, that each object has a private [[Prototype]] object, which references another object (or null) and allows us to inherit methods and properties almost indefinitely.
prototype property
But that's not everything you need to know about prototypes in JavaScript
Whenever we define a function, this function automatically gets assigned a property prototype, which by default will be set to an object containing two properties. constructor, which holds a reference to the function itself and __proto__ which references the private [[Prototype]] object for this object (or null). We can verify this with the following code (You can test this in your browser console or in a Node.js app).
// Just an empty function, to keep things simple.
function Car() {}

console.log(Car.prototype.constructor); // function Car()
console.log(Car.prototype.__proto__); // Object {}
So what is this prototype object?
The above function can be used (as every function) to construct a new object. If we create a new instance by using this function, the private [[Prototype]] property of that new instance will be set to reference the prototype property of the constructor function.
const tesla = new Car();

console.log(tesla.__proto__.constructor); // function Car()
console.log(tesla.__proto__ === Car.prototype); // true
As you can see, the private [[Prototype]] property of tesla is the same as the prototype property of the Car constructor function, because by calling new Car(), the tesla object gets it's private [[Prototype]] set to the Car.prototype object.
It's considered good practise, to add methods and static properties to this prototype object, as this way the methods won't be added to each instance separately, but instead they will be created only once and can be shared across multiple objects. This can save a lot of memory, depending on how many instances and methods youhave.
Inheritance
The prototype chain, as you might have already guessed, is being used to inherit methods and properties from other objects. But how do you actually set up the inheritance?
As we have learned above, we can set the private [[Prototype]] property of an object by calling Object.setPrototypeOf() or by using the __proto__ property.
Again, examples might make it more obvious. Let's imagine, we have a manually created tesla object, but we want it to inherit some methods from Car:
function Car() {}

Car.prototype.drive = function() {
  console.log('The car is driving...');
};

function Tesla () {}

Object.setPrototypeOf(Tesla.prototype, Car.prototype);

const tesla = new Tesla();

tesla.drive(); // The car is driving...
Let's go through the above code line by line:
- In line 1 we declare our
Carconstructor function. It won't do any assignments, to keep things simple. - Line 3-5 adds the function
driveto theCarprototype object, which logs to the console. - Line 7 defines our
Teslaconstructor function. Again, we won't do any assignment, to keep things simple. - Line 9 is where the magic happens. With the
Object.setPrototypeOf()method, we tell JavaScript to set the private[[Prototype]]property of theTesla.prototypeobject to reference theCar.prototypeobject. Now we can use methods and properties declared on theprototypeobject ofCar - Line 11 creates a new object from the
Teslafunction constructor. Remember, that we set the private[[Prototype]]ofTesla.prototypeto referenceCar.prototype. And when instantiating, theTesla.prototypewill be added as the private[[Prototype]]to our new created object. This way, we will have access to all functions and properties, which were attached toTesla.prototypeandCar.prototype. - Line 13 calls the
drivemethod on theteslaobject. As theTeslaconstructor function itself doesn't have this method, JavaScript walks up the prototype chain and finds the method on theCar.prototypeobject. The output will then be 'The car is driving...'
So, for the above example, the prototype chain will look like this (simplified):
tesla.__proto__ -> Tesla.prototype
Tesla.prototype.__proto__ -> Car.prototype
Car.prototype.__proto__ -> Object.prototype
Object.prototype.__proto__ -> null
Bonus: shadowing
When inheriting, it's often required, to override a method or property, which came from an inherited class (or constructor function). In prototypal inheritance, this is called shadowing.
Let's imagine for a second, that we don't want our tesla object to only drive, but instead flowing smoooth on the street. Maybe we use a 3rd party library, which provides us the Car base class and it's good practice, not to override 3rd party prototypes. So the only way to replace/extend our drive method from Car, is to add a method drive to the Tesla prototype object.
Let's get our hands dirty:
function Car() {}

Car.prototype.drive = function() {
  console.log('The car is driving...');
};

function Tesla () {}

Object.setPrototypeOf(Tesla.prototype, Car.prototype);

Tesla.prototype.drive = function() {
  console.log('The tesla is flowing on the street smoothly.');
};

const tesla = new Tesla();

tesla.drive(); // The tesla is flowing on the street smoothly.
Notice, it's important, that you call Object.setPrototypeOf() before adding new methods to the Tesla.prototype object, as they will be overridden otherwise.
In the above code, as soon as we call tesla.drive(), JavaScript again starts at the base of the prototype chain, in our case the tesla object itself. The tesla object itself doesn't have such a method, so JavaScript goes up to it's prototype. The Tesla.prototype object has a function named drive which will be called. At this point, there's no need to walk up the prototype chain anymore. That's why the drive method of Car.prototype won't be called.
But what, if we want to call both methods? Add the following snippet to the Tesla.prototype.drive method, wherever you want the code from the inherited class to be executed: Car.prototype.drive.call(this). This will call the drive method of Car.prototype and bind it's this keyword to the object you are currently interacting with.
function Car() {}

Car.prototype.drive = function() {
  console.log('The car is driving...');
};

function Tesla () {}

Object.setPrototypeOf(Tesla.prototype, Car.prototype);

Tesla.prototype.drive = function() {
  Car.prototype.drive.call(this);
  console.log('The tesla is flowing on the street smoothly.');
};

const tesla = new Tesla();

tesla.drive();
// The car is driving...
// The tesla is flowing on the street smoothly.
Conclusion
We saw, that each object has a private [[Prototype]] property, which defines, which object we are inheriting properties and methods from. We also saw, that functions have a prototype property, which is an object, that gets set as the private [[Prototype]] property of instances created with that function.
There is a lot more you can learn about prototype. If you understood the above principles, I recommend you red through the MDN Documentation and get your hands dirty by experimenting.
If you have any further questions, aspects you are unsure with or found anything, that is incorrect in this article, don't hesitate to reach out to me on Twitter: @ivansieder.